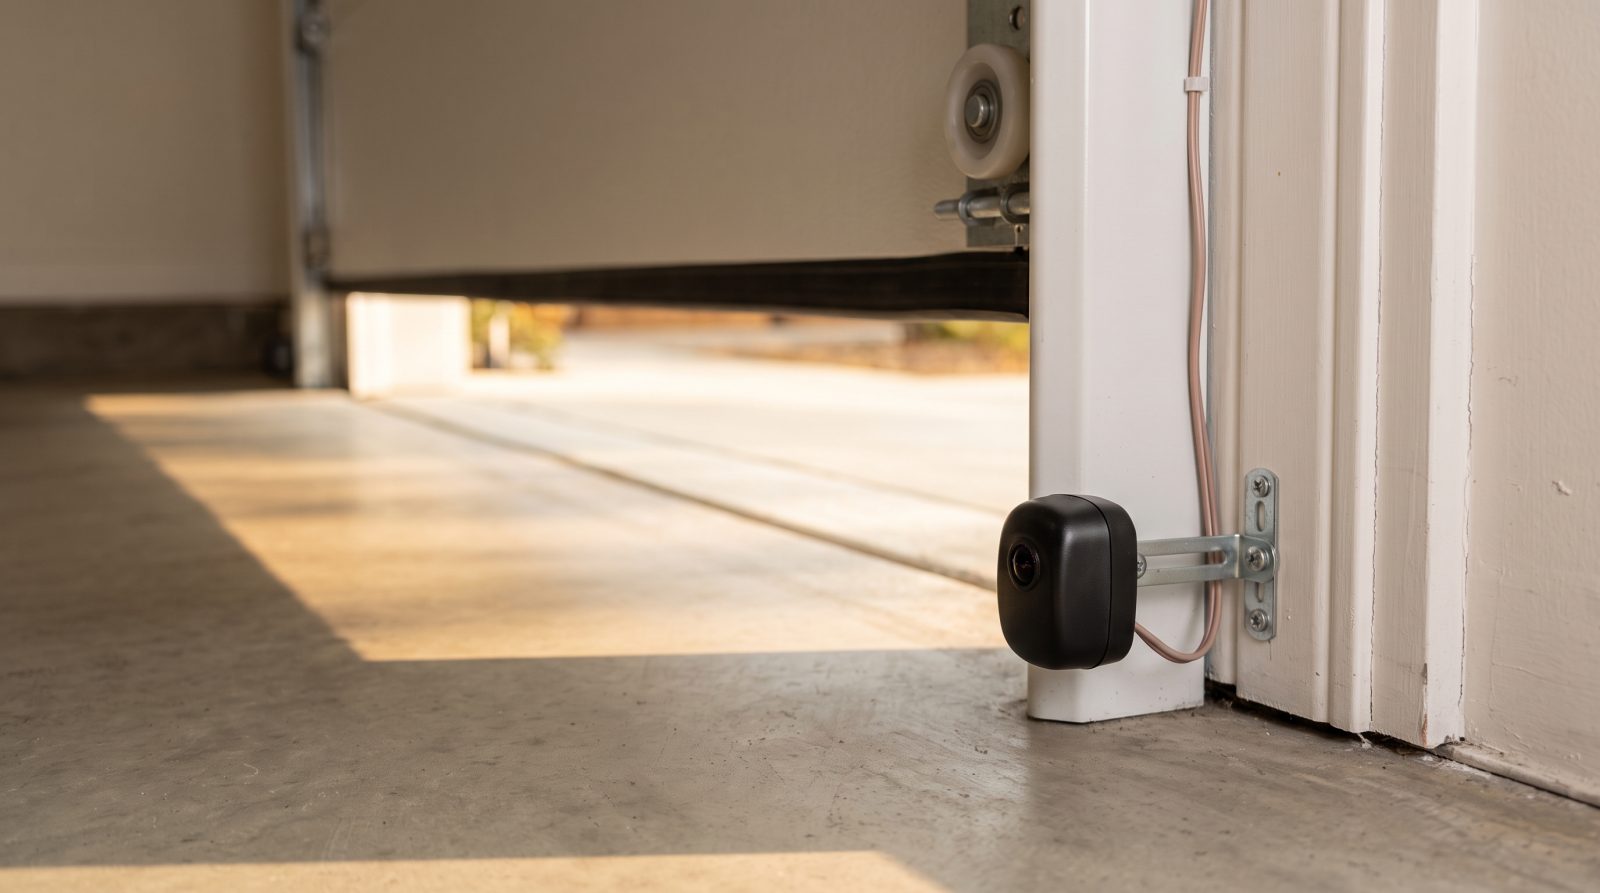
What Photo-Eye Safety Sensors Actually Do
Every automatic garage door opener sold in the United States since the early 1990s is required to have a secondary entrapment-protection system, and on residential doors that system is almost always a pair of photoelectric sensors, commonly called photo-eyes. They sit on each side of the door opening, mounted to the vertical tracks roughly four to six inches off the floor. One sensor sends an invisible infrared beam straight across the doorway; the other receives it. As long as that beam travels uninterrupted from one side to the other, the opener knows the path is clear.
The instant something breaks the beam while the door is closing, a pet darting through, a trash can, a child's foot, the opener immediately stops and reverses the door back to the fully open position. This is non-contact protection: the door doesn't have to touch the obstruction to react, which is what makes it so effective at preventing the serious injuries that pushed this requirement into law. It's worth understanding that the photo-eyes only govern the closing motion. They do not stop a door that's opening, and they are a backup to the opener's own force-sensing system, not a replacement for it.
Because the entire safety system depends on that one fragile beam reaching the receiver cleanly, anything that blocks, dims, or knocks the beam off target will make the door refuse to close, or close and immediately reverse. That sensitivity is by design. The opener is built to fail safe, meaning that when in doubt, it leaves the door open rather than risk closing on a person or pet.
- Two sensors per door: a sending eye and a receiving eye, one on each track near the floor
- They protect the closing cycle only, by reversing the door the moment the infrared beam is interrupted
- Required as entrapment protection on residential openers manufactured since 1993
- Designed to fail safe: a broken or confused beam keeps the door open rather than risk closing on something
Why They Matter: The Safety Story Behind the Beam
These sensors exist because garage doors are the largest and heaviest moving objects in most homes, and before the requirement, automatic openers were involved in tragic and preventable injuries, particularly to young children who were caught underneath a closing door. In response, the U.S. Consumer Product Safety Commission backed federal requirements (rooted in the Underwriters Laboratories UL 325 standard) mandating that residential openers include this kind of secondary, non-contact protection. The photo-eye became the standard answer.
It's tempting to treat a misbehaving sensor as an annoyance and look for a way to bypass it, especially when a door won't close on a cold morning and you're trying to leave. Resist that. Defeating or permanently overriding the photo-eyes removes the exact protection that's there to catch the thing you can't see, the toddler, the pet, the bag of groceries set down in the doorway. A door closing on an obstruction can cause crushing injuries, and an unbalanced door descending without that safety net is genuinely dangerous.
The reliable takeaway is this: when the door reverses for no obvious reason, the system is usually working correctly and telling you the beam is compromised. Your job is to find why the beam is broken and restore it, not to silence the warning. Nearly all of the time, restoring it is a five-minute job.
- The requirement grew directly out of preventing entrapment injuries to children and pets
- Photo-eyes provide non-contact protection, reacting before the door ever touches the obstruction
- Never permanently bypass or disable the sensors to force a stubborn door closed
- A door that reverses on its own is usually the safety system doing its job, not failing
The Most Common Reasons Your Sensors Fail (and What to Check First)
The overwhelming majority of sensor problems fall into three buckets: a dirty lens, a misaligned eye, or a wiring or power issue. Start with the simplest. Each sensor has a small lens, and over time these collect dust, cobwebs, road grime, and condensation. A film you can barely see is enough to weaken the beam below the threshold the receiver needs. Wipe both lenses gently with a soft, dry cloth, then look again. Don't use harsh solvents, which can cloud the plastic.
Next, check alignment. The two eyes have to point almost perfectly at each other. A bumped bracket, a lawn mower or bike that brushed past, a snow shovel leaning in the corner, or even a slow sag in a loose mounting screw can twist one eye off target. Most sensors have a small indicator LED: typically the receiving eye glows a steady light when it sees the beam and blinks, flickers, or goes dark when it doesn't. Gently nudge the sensor until the light goes solid, then snug the bracket. Also scan the doorway for anything physically breaking the beam at ankle height, a stored item, a hose, even tall debris blown in.
If the lenses are clean, nothing is in the path, and the eyes still won't show a steady light, look at power and wiring. The thin sensor wires running up to the opener can be nicked by a staple, chewed by rodents, corroded at a connection, or knocked loose. A sensor with no power light at all often points to a wiring fault or a failed sensor rather than alignment. This is the boundary where homeowner checks end and a closer diagnosis begins.
- Clean both lenses first with a soft dry cloth, condensation and dust alone can break the beam
- Confirm both sensors point at each other and watch the LED, steady usually means aligned, blinking or dark means not
- Clear the doorway of anything crossing the beam at floor level
- Check for loose brackets, nicked or chewed wires, corroded connections, and dead indicator lights, signs the problem is electrical, not just alignment
How to Realign Your Photo-Eye Sensors, Step by Step
Realigning a photo-eye is one of the most satisfying small repairs a homeowner can do, because the result is immediate. Begin at the opener: if your unit has a wall control with a lock or vacation feature, make sure it isn't engaged, since that can mimic a sensor fault. Then go to the sensors themselves. Loosen the wing nut or screw on the bracket of one sensor just enough that you can move the eye by hand without it falling.
Watch the indicator LEDs as you work. With one sensor held steady, slowly tilt and pivot the other until the receiving sensor's light glows solid and stops flickering. Some people stretch a string or use a small level across the two brackets to get them to the same height and angle, which helps on doors where a bracket has slipped. Once you have a steady light, tighten the bracket carefully so you don't knock it back out of position as you do, and then re-check the LED. Snugging a bracket often nudges the eye, so confirm the light stays solid after tightening.
Finally, test the door several times. Trigger it to close and let it complete the cycle, then close it again while waving a broom handle through the beam to confirm it reverses on cue. A door that now closes smoothly and reliably reverses on an obstruction is back to a safe state. If the light will only stay steady when you hold the sensor and drifts the moment you let go, the bracket or wiring needs attention rather than another nudge.
- Confirm the wall control's lock or vacation mode is off before blaming the sensors
- Loosen one bracket, then pivot the eye until the receiver's LED glows steady
- Match the two sensors' height and angle, a string or small level helps if a bracket has slipped
- Tighten gently and re-check the light, then test the full close cycle twice, including waving an object through the beam
How Climate and Region Change the Picture
Photo-eyes work the same way everywhere, but what knocks them out of alignment varies a lot by where you live. In cold-winter regions, condensation and frost can fog the lenses on freezing mornings, and that thin layer of moisture is a classic cause of a door that won't close until the sun warms things up. Snow piled or shoveled near the door opening can also drift into the beam path. In these climates, a quick lens wipe before you leave on a bitter morning saves a lot of frustration.
In hot, sunny regions, the enemy is often direct light. Low-angle morning or evening sun shining straight into a receiving sensor can overwhelm the infrared beam and cause intermittent reversals that seem to have no cause. Dust is a bigger factor in arid and rural areas, while humid coastal climates accelerate corrosion on the small wire connections and brackets. Homes in storm-prone areas deal with debris and insects nesting in or around the sensors after wet spells.
None of this changes the repair, it changes how often you'll need it and what to look for first. If your sensor faults are seasonal or time-of-day specific, that pattern is a strong clue: morning-only faults in winter point to condensation, sunset reversals in summer point to glare, and faults after a storm point to debris or moisture in the wiring. Knowing your local pattern lets you fix the real cause instead of chasing it.
- Cold climates: morning condensation, frost on the lens, and shoveled snow drifting into the beam
- Hot, sunny climates: direct low-angle sunlight into the receiver causing intermittent reversals
- Arid and rural areas: dust buildup on lenses; humid coastal areas: corrosion at wire connections
- Seasonal or time-of-day patterns are diagnostic, they usually point straight at the real cause
When to Stop and Call a Local Garage Door Pro
Most sensor problems are genuinely DIY-friendly, but there's a clear line where guessing stops paying off. If you've cleaned the lenses, confirmed nothing is in the beam, realigned the eyes, and one or both indicator lights still won't come on or stay steady, the issue is likely a failed sensor, damaged wiring, or a problem on the opener's logic board. Those call for a technician with a meter and the right replacement parts, and a matched, compatible sensor set rather than a random universal part.
There's a second, more important line. If your door reverses with the sensors clearly checking out, slams down instead of lowering smoothly, feels extremely heavy by hand, or makes loud banging noises, the real problem may be in the springs, cables, or balance, not the sensors at all. High-tension torsion springs and lift cables store enormous force and are responsible for the most serious garage door injuries. They are not a homeowner repair under any circumstances. Leave the door closed and bring in a qualified pro.
The convenience of an automatic door is only worth it when the safety system underneath it is sound. A local technician can confirm the sensors, wiring, and door balance are all working together as they should, often as part of a routine tune-up. If your simple checks haven't restored a smooth, reliable close, that's the moment to get a trained set of eyes on it. You can request a free quote and have a local pro diagnose it quickly, often the same day.
- Call a pro when indicator lights stay dark or unsteady after cleaning, alignment, and clearing the path, that signals a failed sensor, wiring fault, or board issue
- Stop immediately if the door slams, feels very heavy, or bangs, that points to springs or cables, never a DIY fix
- Matched, compatible replacement sensors and a meter are part of a proper diagnosis
- A local technician can verify sensors, wiring, and door balance together, often during a routine tune-up