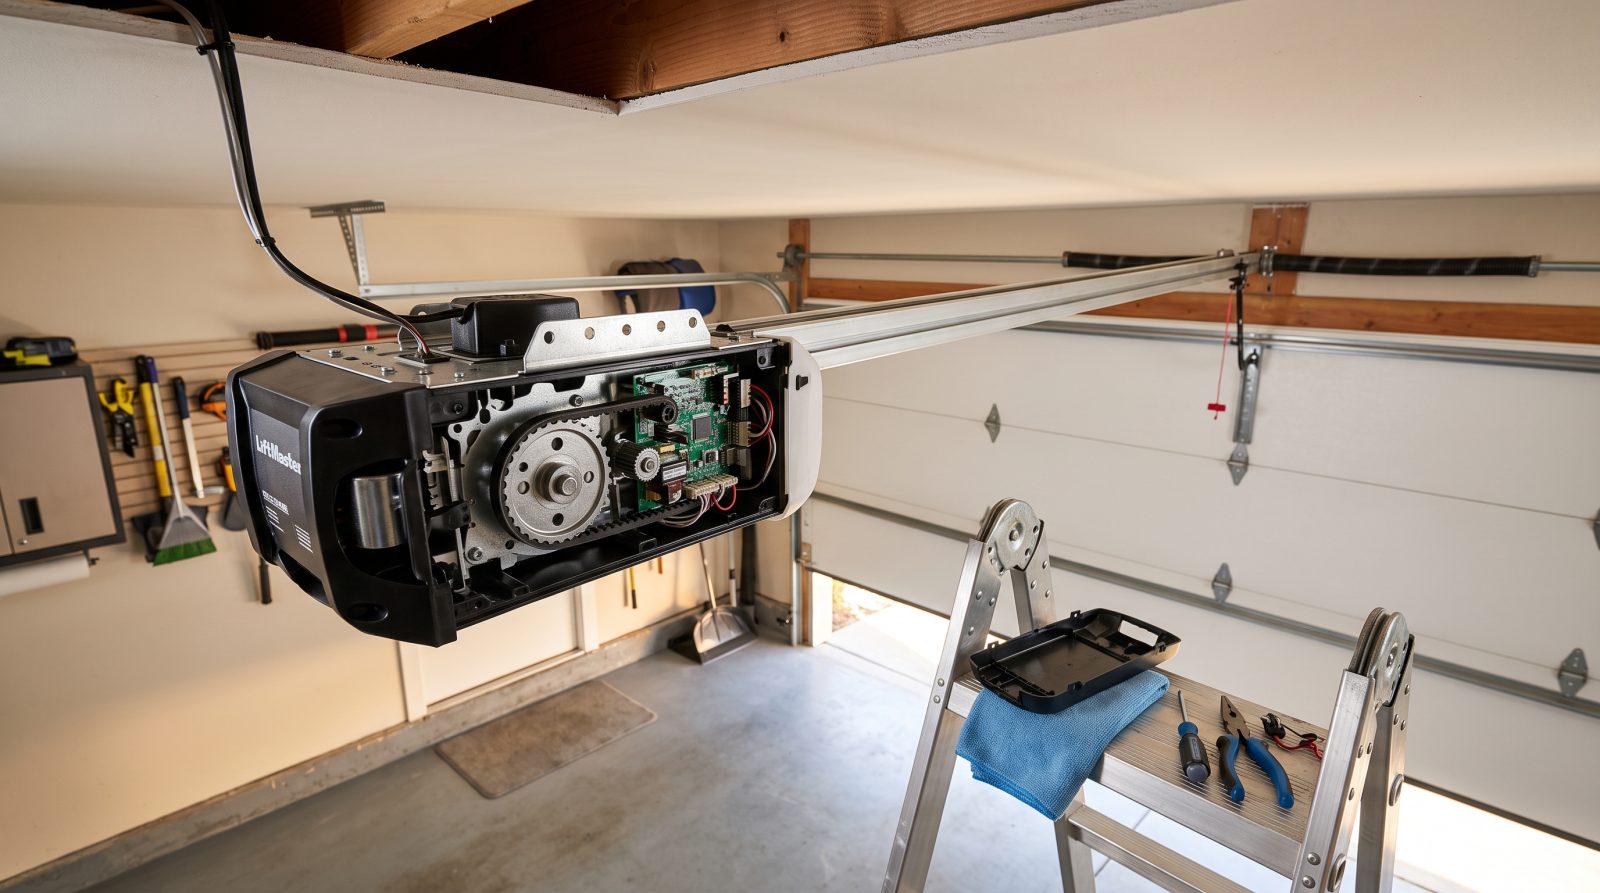
How a Modern Garage Door Opener Actually Works
It helps to know what you're dealing with before you start troubleshooting. A garage door opener is not what lifts the heavy door — the springs do almost all of that work. The opener's motor only needs to nudge an already-balanced door along its track. That single fact explains a lot: if your springs are weak or broken, even a perfectly healthy opener will struggle, strain, or refuse to lift, because you're now asking a small motor to do a big spring's job.
Most residential units fall into three drive types. Chain-drive openers use a metal chain and tend to be the loudest but most durable — common in garages where noise isn't a concern. Belt-drive openers swap the chain for a reinforced rubber belt and run much quieter, which matters when there's a bedroom above the garage. Screw-drive openers use a threaded steel rod and have fewer moving parts, though they can be more sensitive to temperature swings. Newer wall-mount (jackshaft) openers mount beside the door instead of overhead.
Every modern opener also has a brain — a logic board — and a pair of safety sensors mounted near the floor on each side of the door. The logic board interprets your remote, wall button, and keypad signals and tells the motor what to do. The photo-eye sensors shoot an invisible beam across the opening; if anything breaks that beam while the door is closing, the opener is required by federal safety standards to stop and reverse. Knowing these four parts — motor, drive mechanism, logic board, and sensors — is the key to diagnosing nearly every opener fault.
- The springs lift the door; the opener only guides it — a strained motor often means a spring problem, not a motor problem.
- Drive types: chain (loud, tough), belt (quiet), screw (fewer parts), and wall-mount/jackshaft (mounts to the side).
- The logic board is the opener's brain and a common failure point after power surges or lightning.
- Photo-eye safety sensors are required by law to reverse the door if the beam is broken — and they're the #1 cause of a door that won't close.
The Most Common Reasons an Opener Stops Working
Opener complaints almost always fall into a handful of patterns, and the pattern itself usually points to the cause. A door that's completely dead — no lights, no hum, no response from any control — is typically a power problem: a tripped GFCI outlet, an unplugged unit, or a failed transformer or logic board inside the motor head. A door that hums or clicks but won't move usually means the motor is getting power but something downstream has failed, often a stripped drive gear or a motor capacitor that can no longer start the spin.
When the door starts to close and then reverses every time, the suspects are the safety sensors, the travel-limit settings, or binding in the track. Misaligned or dirty photo-eyes are the leading offender — a slight bump, a spider web, or sun glare hitting the lens can be enough. If the door reverses on the way up or stops short, the open/close limit settings on the motor head may have drifted out of calibration. And if the remote works but the wall button doesn't (or vice versa), you're often looking at a wiring or control-board issue rather than the motor.
Climate plays a real role here, and it varies by region. In cold-winter states, grease stiffens, metal contracts, and a door that worked fine in October can suddenly reverse or struggle in January — sensors and limits frequently need seasonal adjustment, and rollers benefit from a winter-rated lubricant. In hot, humid, or coastal areas, corrosion on chains, hinges, and electrical contacts accelerates, and salt air is especially hard on hardware. In storm-prone and lightning-heavy regions, a surge-fried logic board is one of the most common reasons an otherwise young opener suddenly goes dead.
- Completely dead: check power, the GFCI outlet, and the breaker before assuming the motor is gone.
- Hums or clicks but won't move: often a stripped plastic drive gear or a failed starting capacitor.
- Closes then reverses: usually misaligned/dirty photo-eye sensors or a close-limit that needs recalibrating.
- Reverses while opening or stops short: travel-limit settings have drifted and need adjustment.
- Remote works but wall control doesn't: typically a wiring or logic-board fault, not the motor.
- Cold regions stiffen parts and shift sensor alignment; hot/coastal regions corrode hardware; storm regions fry logic boards via surges.
Five-Minute Troubleshooting You Can Safely Do Yourself
Before calling anyone, there are several genuinely safe checks that resolve a surprising share of opener problems — and none of them involve touching the springs, cables, or anything under tension. Start with power: make sure the opener is plugged in, then check that the outlet has power (a GFCI outlet near a garage often trips). Reset the breaker for the garage circuit if needed. If your control panel and lights are dead, this is the first and most likely fix.
Next, look at the safety sensors near the floor on each side of the door. There's usually a small indicator light on each one. If a light is off, blinking, or flickering, the beam is blocked or misaligned. Wipe the lenses clean, clear anything in the path, and gently nudge a sensor so both lights glow steady. This single step fixes a huge number of 'won't close' and 'reverses immediately' complaints. Also check that nothing — a stored item, a bike, a stray object — is physically obstructing the door's path.
Finally, test whether the problem is the opener or the door itself. Pull the manual release cord (the red handle) to disconnect the door from the opener, then carefully lift the door by hand about halfway. A balanced door should move smoothly and roughly stay put when you let go. If it's extremely heavy, crashes down, or won't budge, you likely have a spring or balance problem — and you should stop and call a pro, because that's exactly the high-tension work that causes serious injuries. If the door moves smoothly by hand but the opener won't drive it, the issue is in the opener. Try fresh remote batteries and reprogram the remote per your owner's manual before concluding the unit has failed.
- Confirm power: plugged in, GFCI outlet not tripped, breaker on.
- Clean and realign the photo-eye sensors until both indicator lights are steady — fixes many reverse/won't-close issues.
- Clear any object in the door's path or breaking the sensor beam.
- Use the manual release to test the door by hand: smooth = opener issue; heavy or crashing = stop and call a pro (likely spring/balance).
- Replace remote batteries and reprogram remotes/keypads before assuming the opener is dead.
- Never adjust springs, cables, or anything under tension — that's where DIY garage door injuries happen.
Repair, Reprogram, or Replace? Knowing the Difference
Not every opener problem is worth a full replacement, and not every old opener is worth repairing. Many faults are genuinely repairable for a fraction of replacement cost: a stripped drive gear, a worn trolley or carriage, a failed capacitor, a frayed pull cord, dead sensors, or a single damaged section of rail. These are bread-and-butter fixes a technician can often complete in one visit, and they make sense on a unit that's otherwise sound and not too old.
A logic-board failure is the classic 'it depends' situation. On a relatively recent, quality opener, replacing the board can be the right call. But if the unit is older, the board is expensive or hard to source, and other parts are wearing out too, you can spend most of the cost of a new opener chasing one repair. The same logic applies to a burned-out motor — once the motor itself is gone on an aging unit, replacement is usually the smarter long-term move.
There are also good reasons to upgrade even when a repair is possible. Older openers may lack modern photo-eye safety sensors or rolling-code security (which changes the access code on every use to prevent code theft). A noisy chain-drive over a bedroom can be swapped for a quiet belt-drive. Newer units add smartphone control, battery backup so the door still works in a power outage, and stronger weather and surge resilience — meaningful upgrades in regions prone to outages or storms. A good technician will tell you honestly when a repair is the better value and when you'd be throwing money at a unit near the end of its life.
- Usually worth repairing: stripped gears, worn trolley/carriage, failed capacitor, dead sensors, frayed cord, a single rail section.
- Judgment call: logic-board replacement — fine on a newer unit, often not worth it on an aging one with other wear.
- Lean toward replacement when: the motor is burned out, parts are obsolete, or repair costs approach a new unit's price.
- Worth upgrading for: modern safety sensors, rolling-code security, quieter belt-drive, battery backup, and surge/weather resilience.
- A trustworthy pro will tell you when NOT to repair — get a clear before/after explanation either way.
What Opener Repair Typically Costs (Estimates, Not Quotes)
Pricing varies widely by part, brand, your region, and how the work is bundled, so treat any figure here as a typical industry range rather than a quote — your actual price depends on your specific opener, the parts needed, and local labor rates. As a rough sense of scale, a service call plus a minor fix like sensor realignment or a remote/keypad reprogram tends to sit at the lower end. Component repairs such as replacing a drive gear, capacitor, or trolley generally fall in a mid range once parts and labor are combined.
Bigger-ticket items move the number up. A logic-board replacement depends heavily on the brand and part availability. A full opener replacement — new motor unit, rail, and installation, sometimes with battery backup or a quieter drive — is the largest line item and spans a broad range depending on the model and features you choose. Coastal and major-metro areas often run higher on labor than rural ones, and emergency or after-hours service typically carries a premium.
The honest way to budget is this: get the specific problem diagnosed first, then ask for the repair estimate next to the replace estimate so you can compare value side by side. A reputable local provider will explain what's failing, what the realistic options are, and what each path costs in your area — without pressure to replace something that could be repaired. When you're ready, you can request a free quote for your exact opener and situation.
- All figures are typical industry ranges, not fixed prices — your cost depends on the part, brand, scope, and your region.
- Lower end: service call plus minor fixes like sensor realignment or remote reprogramming.
- Mid range: component repairs such as drive gear, capacitor, or trolley replacement (parts + labor).
- Higher end: logic-board replacement (brand-dependent) and full opener replacement with installation.
- Metro and coastal areas, plus after-hours service, generally run higher.
- Always ask for a repair estimate alongside a replace estimate so you can compare value.